How to get *root* access in Android Emulator

***This article is current as of Sept 2013***

I read many articles and forums for getting the root access on Android Emulator or phone but none of them worked for me *as is*, so I thought of putting together a series of instructions that worked for me and hopefully will work for you as well.

  1. Here is what you need to download
    1. su
    2. Superuser.apk
  2. Did you set Android SDK path in your environment variables or in short can you open a command or terminal window and type adb and see if the path is set?
    1. if yes then you can copy the above two files anywhere you want and just move to that directory
    2. If no then just copy the above two files to your <YOUR_SDK_INSTALL_DIR_PATH>/platform-tools/
  3. Make sure to start your emulator now and wait until it is all good or basically it shows up when you execute “adb devices” command. Also make sure only one emulator is running and no other devices are connected.
  4. In your terminal/command window go to the following location <YOUR_SDK_INSTALL_DIR_PATH>/platform-tools/ and get ready to execute few commands.
    1. adb remount
    2. adb push su /system/xbin/su
    3. adb shell chmod 06755 /system
    4. adb shell chmod 06755 /system/xbin/su
    5. adb install Superuser.apk

If all goes well so far then you have root access now. You can check that by following commands
adb shell
su
You should now get su access!

Note: Any time you restart the emulator then you have to repeat step 4.C and 4.D

Get on the cloud!

Cloud computing is becoming popular and a lot of companies already started deploying their applications on cloud or have plans on doing so in near future. Having your services on cloud allows for greater scalability, improved performance and ease of development. In this article we will introduce some of the basic concepts.

You can have your own private cloud or can use a public one by many of the vendors such as Amazon, Eucalyptus etc. The one we use in this article is from VMware called Cloudfoundry and is a beta product so is free to try on. This cloud supports Java, Grails and .NET based frameworks. For more reference look at blog.cloudfoundry.com 

We will start with creating an account and deploying a sample java based application on it.

  1. Signup yourself at cloud foundry signup (EDIT: This process is much faster in 2013 as earlier it used to take 2-3 weeks)
  2. Download Spring based IDE (STS) or Eclipse for development and connecting to Cloud.
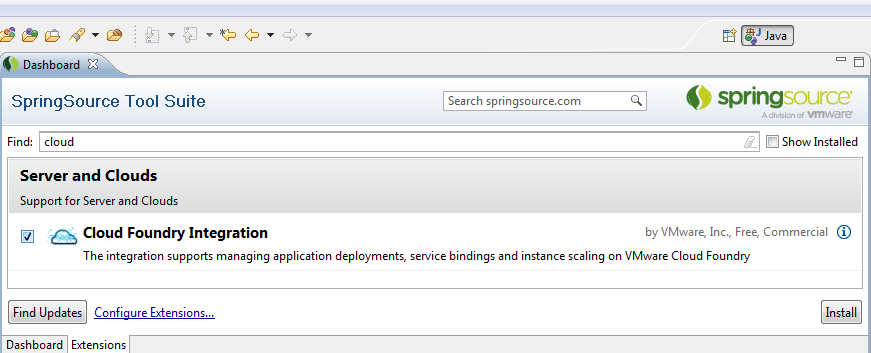
  3. Integrate STS with Cloud Foundry Extension by opening up STS–>Help–>Dashboard and then going to Extensions tab. Search for Cloud Foundry and install it
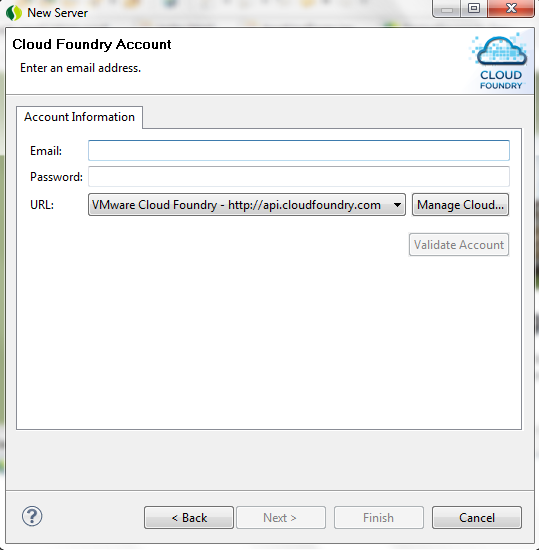
  4. Add a New Server in STS and select VMware–> Cloud Foundry
  5. Now supply your login credentials here which you received from step 1 and validate account.
  6. Almost done! This is how your server will look like. Now just add any web project to it and enjoy the benefits of cloud.

Here is a sample web project that you can push to the cloud https://github.com/spinachsoftware/HelloCloudWebApp.

Here is the URL to check for an already deployed web app http://hellocloudwebapp.cloudfoundry.com

Stay with us to see more advance versions for web apps deployed on cloud which will use resources such as messaging, database and so on. More is coming….

Introduction to RESTful services in few simple steps

REST (Representational state transferhas become very popular and in fact it was always there but we just didn’t see it until Roy Fielding presented his doctoral dissertation. It gives us the power of distributed computing without the hassle of redefining the protocol to access those distributed objects.

The current peers of REST can be EJB and the so called Service oriented architectures which again requires their own custom protocols such as RMI or SOAP. Unlike REST works with HTTP protocol and hence leverage whats already there. We can define distributed objects using REST and access those object using simple HTTP protocols such as GET, PUT, DELETE etc.

Furthermore, the REST based server side object can be deployed in a simple web container which makes it easy enough to use with Spring and a no EJB approach. Think about this that if you develop a RESTful service then it will be useful for a mobile view as well as a desktop because the protocol to access it is light-weight HTTP

Enough of theory… now lets just build something which will be useful in daily life. An example of a very common service is address validation. We all need to verify whether the zipcode entered by the user is valid. I understand that google or some other vendor will already have such a service but for now lets just build that on a smaller scale.

Simple Zip Locator REST App

To build a REST app we need a provider that can run the distributed object in the Servlet container. For that we are using Apache CXF. This will be a no database and in-memory example for simplicity.

  1. First we need something to hold zip code information. Lets name it ZipcodeDetails 
@XmlRootElement
public class ZipcodeDetails implements Serializable
{
private String zipcodeId;
private String cityName;
private String state;
}

2.  The service name will be FindZipcodeService. Please note that we are defining that the results can be consumed as XML or JSON using @Produces annotation. We can define more Media types if needed. Also the @Path annotation is what leads us to these methods. Again if you are familiar with Spring MVC then it should be straight forward.

@Produces({MediaType.APPLICATION_XML, MediaType.APPLICATION_JSON})
public class FindZipcodeService
{
@GET
@Path("findbyzipcode/{zipcode}")
public ZipcodeDetails findzipcodeDetails(@PathParam("zipcode") String zipcode) {..}
}

3.  This is how we can define the REST service using Apache CXF in applicationContext,.xml

<bean class="org.apache.cxf.jaxrs.provider.XMLBeansElementProvider" id="xmlBeanProvider">
<bean class="org.apache.cxf.jaxrs.provider.XMLBeansJSONProvider" id="jsonProvider">       <jaxrs:server address="/" id="zipcodeService">
<jaxrs:servicebeans>
<ref bean="findZipcodeService">
</ref></jaxrs:servicebeans>
<jaxrs:providers>
<ref bean="xmlBeanProvider">
<ref bean="jsonProvider">
</ref></ref></jaxrs:providers>
</jaxrs:server>
</bean>
</bean>

4.  Main project dependencies are Apache CXF and JaxRS

<dependency>
<groupid>org.apache.cxf</groupid>
<artifactid>cxf-rt-transports-http</artifactid>
<version>${cxf.version}</version>
</dependency>
<dependency>
<groupid>org.apache.cxf</groupid>
<artifactid>cxf-rt-frontend-jaxrs</artifactid>
<version>${cxf.version}</version>
</dependency>
<dependency>
<groupid>javax.ws.rs</groupid>
<artifactid>jsr311-api</artifactid>
<version>1.1</version>
</dependency>

5.  Finally your Web XML needs to define the Dispatcher servlet to handle REST related request as shown.

<servlet>
<servlet-name>CXFServlet</servlet-name>
<servlet-class>org.apache.cxf.transport.servlet.CXFServlet</servlet-class>
<load-on-startup>1</load-on-startup>
</servlet>
<servlet-mapping>
<servlet-name>CXFServlet</servlet-name>
<url-pattern>/rest/*</url-pattern>
</servlet-mapping>

6.  When you deploy this on Jetty/Tomcat or any Server give the context path to “/”. This way the URL will be formed as http://localhost:8080/rest/findbyzipcode/55401

Conclusion

This application can be deployed on cloud. see instructions here. For demo purpose we have deployed a full blown ziplocator service to cloud foundry with all US based zip codes. http://ziplocator.cloudfoundry.com e.g. http://ziplocator.cloudfoundry.com/rest/findbyzipcode/55426 as you can see that we can embed this URL in a jQuery to do validation or may be do auto-complete for city and state.

Downloads (complete source code)

How to mock static and final methods while writing JUnit?

Many people will point out that if you are mocking static or final method in your Junit that means something is not correct with the way source code is written and I totally concur with that. However sometimes you may end up in a situation where you have to mock static or final methods e.g. most of the vendor specific framework methods are declared as final.

The solution comes with PowerMock which is an extension to Mockito. PowerMock is the elixir for most of your advanced mocking/Junit needs. It comes with a cost of additional setting overhead though and can be intimidating at first. Please see the example below.

Problem Scenario:
Here is how the source code look:

public class MyClassA
{
public static long timeTaken(long starTime)
{
// want to mock this currentTime() method call.
return currentTime()+days;
}
public static long currentTime()
{
return System.currentTimeMillis();
}
}

Solution:
Lets say we are testing timeTaken() method and would like to mock currentTime()method then here is how you could do that using PowerMock

@RunWith(PowerMockRunner.class)
@PrepareForTest(MyClassA.class)
public class MyClassATest
{
@Test
public void timeTaken()
{
long whateveryouwant = 1L;
PowerMockito.spy(MyClassA.class);
PowerMockito.when(MyClassA.currentTime()).thenReturn(whateveryouwant);
long xxx = MyClassA.timeTaken(..);
assertEquals(...);
}

Here is what you need to have in your Pom if using Maven. (Please look the latest revision in http://repo2.maven.org/ )

    <dependency>
      <groupid>org.powermock</groupid>
      <artifactid>powermock-module-junit4</artifactid>
      <version>1.4.6</version>
      <scope>test</scope>
    </dependency>
    <dependency>
      <groupid>org.powermock</groupid>
      <artifactid>powermock-api-mockito</artifactid>
      <version>1.4.6</version>
      <scope>test</scope>
    </dependency>